|
Overview
After completing all the external bolt-on performance mods (Stage 1), the engine was producing an estimated 220hp and 262lbft. The only way to increase the outputs further was to either add forced induction or to internally modify the engine. Forced induction was not on the agenda, and I wasn't keen to tear into the short block either since the engine was still in excellent condition at 163k miles, so installing a ported head was the obvious way to go.
The factory HO head is fairly efficient but there's room for improvement particularly in exhaust port flow. At the time, the ultimate cylinder head conversion was the Accurate Power big valve head with 2.02" intake/1.60" exhaust valves. This produced a dyno-proven 16hp gain on a stock 4.0L engine and a 22hp gain on a 4.6L stroker engine. Unfortunately this head cost a whopping 1349 US dollars and I wasn't willing to spend that much money plus more for shipping, so I took a more economical approach.
I bought a good used '95 HO head with a full set of valves from a junkyard for only 213 US dollars. After cleaning it thoroughly and removing the old gasket material, I ported it using the Standard Abrasives deluxe porting kit. I followed the Standard Abrasives DIY head porting guide to do this procedure. It was a very helpful article and I recommend anyone who's contemplating home porting cylinder heads to read it carefully. The knowledge gained from this article will help you to get the best results and to avoid making mistakes that can ruin the head. They recommend that you use a die grinder but since I couldn't find one, I used my electric drill instead. It worked like a charm.
I also wanted to increase the compression ratio (CR) of the engine from 8.8 to 9.1:1. The reasons for this were more HP/TQ, better fuel economy through improved thermodynamic efficiency, and better emissions. The stock camshaft also works optimally with this higher CR.
|
| |
Intake port entries and exhaust port exits
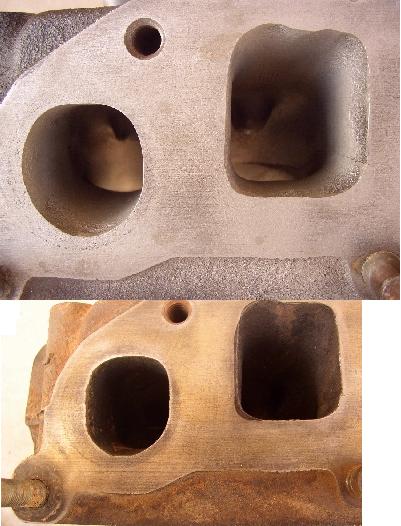
The first step of the porting procedure was to match the intake port entries to the combination manifold gasket. The holes in the gasket did not line up properly with the intake ports and were offset by at least 1mm on either side. I scribed a line around each port to match the edges of the gasket, and scribed a line around each gasket hole edge to match it to the opposite side of each intake port.
I ground the intake port entry walls, roof, and floor inside the lines that I'd scribed up to a depth of 1.5" into the head. I blended the now larger port openings into the remaining port by removing progressively less material as I moved down into the intake port.
I also ground the gasket within the lines that I'd scribed so the gasket holes and intake ports were perfectly matched. The rectangular intake port entries now measured 1.654" x 1.417" (C/S area 2.342 sq. in. or 81.8% of intake valve head area). Better!
The holes in the gasket for the exhaust ports were much bigger than the exhaust ports themselves so I left those alone.
The exhaust ports were oval-shaped and too small to provide good airflow. I enlarged them and made them rounder to more closely match the internal diameter of the header. The final size was 1.417" x 1.338" (C/S area 1.489 sq. in. or 84.3% of exhaust valve head area). Perfect!
|
 Stock head: bottom, Ported head: top
 |
| |
Short Side Radius and Bowl Work
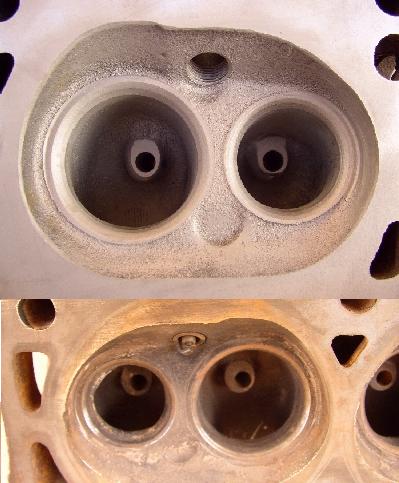
The intake ports looked pretty good in these areas. The short side radii were fairly smooth and there were only minor casting bumps in the valve throat area. I ground those away and smoothed the small side radii. The valve throat diameter remained at 1.625" (or 85.1% of intake valve head diameter). The valve guide bosses were large and protruded quite a bit into the ports. I ground them down and tapered them into a teardrop shape to make them more aerodynamic.
By contrast, the exhaust ports looked very restrictive. The short side radii were rough and turned sharply, and there were large ridges at the valve throats that reduced the diameter to only 1.18". I ground away the ridges below the seats and blended in the valve throats to the bowl areas. The valve throats were opened up to 1.26" (or 84% of exhaust valve head diameter). I also took out material from the short side radii and smoothed them off. The exhaust valve guide bosses were also big so I ground those down in the same manner as I did to the intakes.
The final step here was to unshroud the exhaust valves. There was only 0.078" of clearance between the exhaust valves and the combustion chamber walls. I began by scribing a line inside the head gasket bores of each cylinder onto the head surface. Then I ground away material from the combustion chamber walls until I'd reached the lines and blended the ground areas in with the adjacent wall surfaces. The clearance was increased to 0.118". Much better! |
 Stock head: bottom, Ported head: top
 |
| |
Other Reconditioning Work
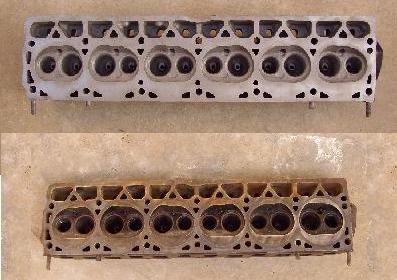
The combustion chambers measured 56.5cc before I did any porting work. I wanted to raise the CR so the next step was to get 0.010" milled from the the head surface. This reduced the combustion chamber volume to 55.2cc. The rest of the CR increase came from using the Mopar Performance P4529242 head gasket. At 0.043" compressed thickness, it's 0.008" thinner than the OEM head gasket so its volume is 1.7cc less. The total combustion volume was reduced from 84.6cc to 81.6cc resulting in a 9.08:1 CR. Milling the head surface produced some sharp edges around the combustion chambers so I feathered them to leave no detonation-inducing hot spots.
Since this was a used head, I also had the valve seats reground and the valves lapped to match the seats. The head was finally hot tanked to remove all the surface rust and ingrained dirt. The result was a head that looked almost like new. |

Final Verdict
The costs of this project broke down as follows:
Junkyard '95 4.0 HO head & set of 12 valves 213
Standard Abrasives Deluxe porting kit 40
Valves lapped and polished 11
Head surface milled 27
Valve seats reground & polished 32
Head hot tanked 13
Mopar head gasket 19
Combination manifold gasket 15
Intake & exhaust valve stem oil seals, t'stat housing gasket 54
Cylinder head freeze plug 16
TOTAL 440 US Dollars
I saved over 900 US dollars from the cost of an Accurate Power head, and I still have my old head and valves as spare parts. I also invested twelve hours of my time and effort working on the head. Was it worth it?
The answer is definitely yes. A big thumbs up.
Part throttle response has improved even further and only the slightest touch of the throttle is needed to make the Jeep accelerate quickly. It feels the same at low revs but from 3000rpm upwards, the Jeep pulls more strongly and doesn't let up even at the 5250rpm rev-limiter. I was very pleased that I avoided the low rev torque loss that's normally associated with ported heads. Despite the higher CR there's no pinging under load because the quench height is reduced from 0.073" to 0.065". This will also reduce emissions.
The degree of improvement in performance translates into a ~15hp/7lbft gain from the home ported head combined with the slightly higher CR. Intake port flow has increased by an estimated 4% and exhaust port flow has increased by an estimated 14-15%.
Gas mileage improved marginally and this is a possible indication that the engine's running less rich due the increase in airflow.
Hesco CNC Jeep Cylinder Heads #HES40CNC.
The intake, exhaust ports, combustion chambers and valve pockets have all been CNC machined to create a cylinder head with exact uniformity from chamber to chamber. All cylinder head castings have a certain amount of core shift during manufacturing. Therefore ports and combustion chambers are not equal in cc's or flow numbers. They are within "factory tolerances" however. By CNC machining the cylinder head you create a balanced air/fuel and compression ratio between cylinders. This all translates into a smoother and more efficient running engine. Edelbrock Performer Jeep 4.0L Cylinder Head.
The Edelbrock #50169 Performer Cylinder Head is designed as a bolt-on performance upgrade for 1987-2006 Jeep’s with a 4.0L inline six engine. They feature better flowing intake/exhaust ports along with a modern combustion chamber design and back cut and swirl polished valves for improved flow. Retains the stock valve angle, pushrod length and valve cover bolt pattern for use with factory components and off the shelf accessories. Larger reinforced rocker bosses for improved strength at high RPM and Heli-Coil® threaded inserts in the intake manifold bolt holes for added strength as well as a 3/4" deck throughout the head also promotes stiffness and durability. This cylinder head is machined to accept both distributor or coil pack ignition. To optimize airflow, this cylinder head is designed with a 1991-2006 4.0L intake port location and 1991-98 4.0L exhaust port size. As a result, this cylinder head must be used with a 1991-2006 intake manifold and a 1991-1998 exhaust manifold. Aftermarket exhaust headers can also be used in place of 1991-1998 exhaust manifolds and MUST be used in place of 1999-2006 exhaust manifolds. Most aftermarket exhaust headers are compatible, but please check with the exhaust header manufacture to verify. This head is NOT compatible with 1999-2006 OEM exhaust manifolds. |


